Sweet Genius

saltedalmonprailinecake

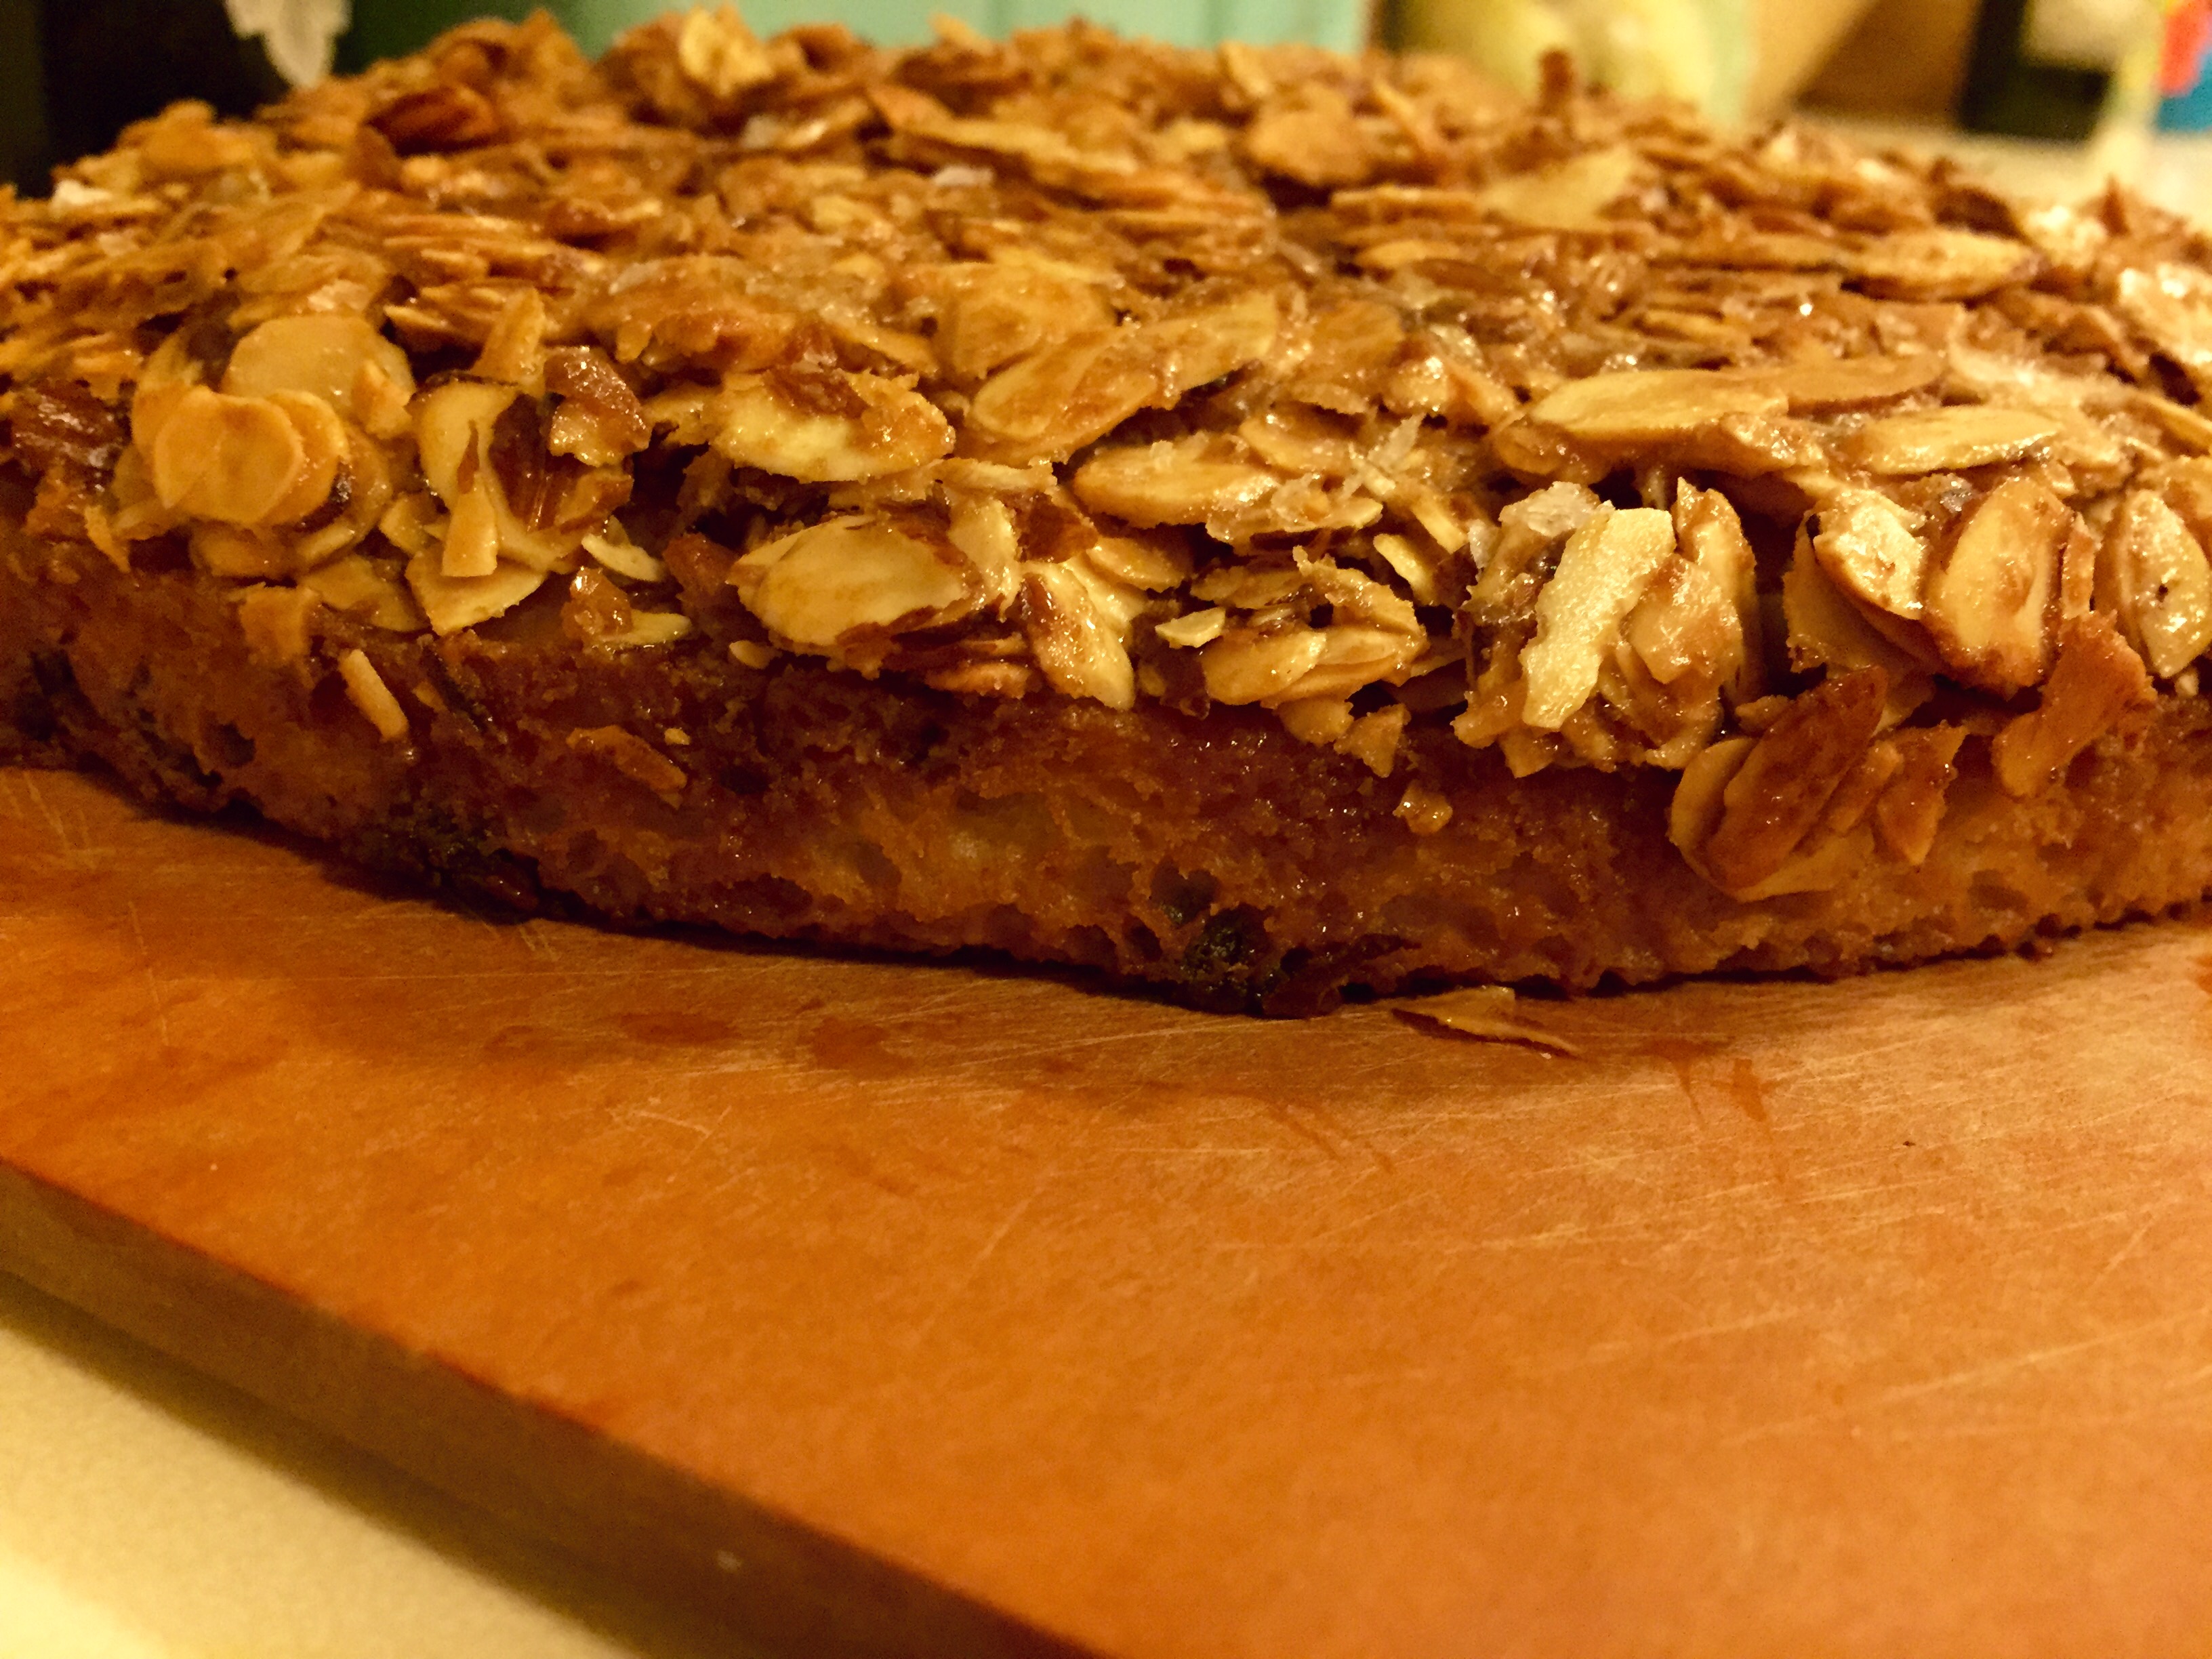
I’ve never considered myself much of a baker. Maybe it’s the precision in baking that scares me, or the time it takes to make sweets, or the simple fact that I rarely leave room for dessert. That being said, I do love a sweet treat, even better is a sweet and salty dessert.

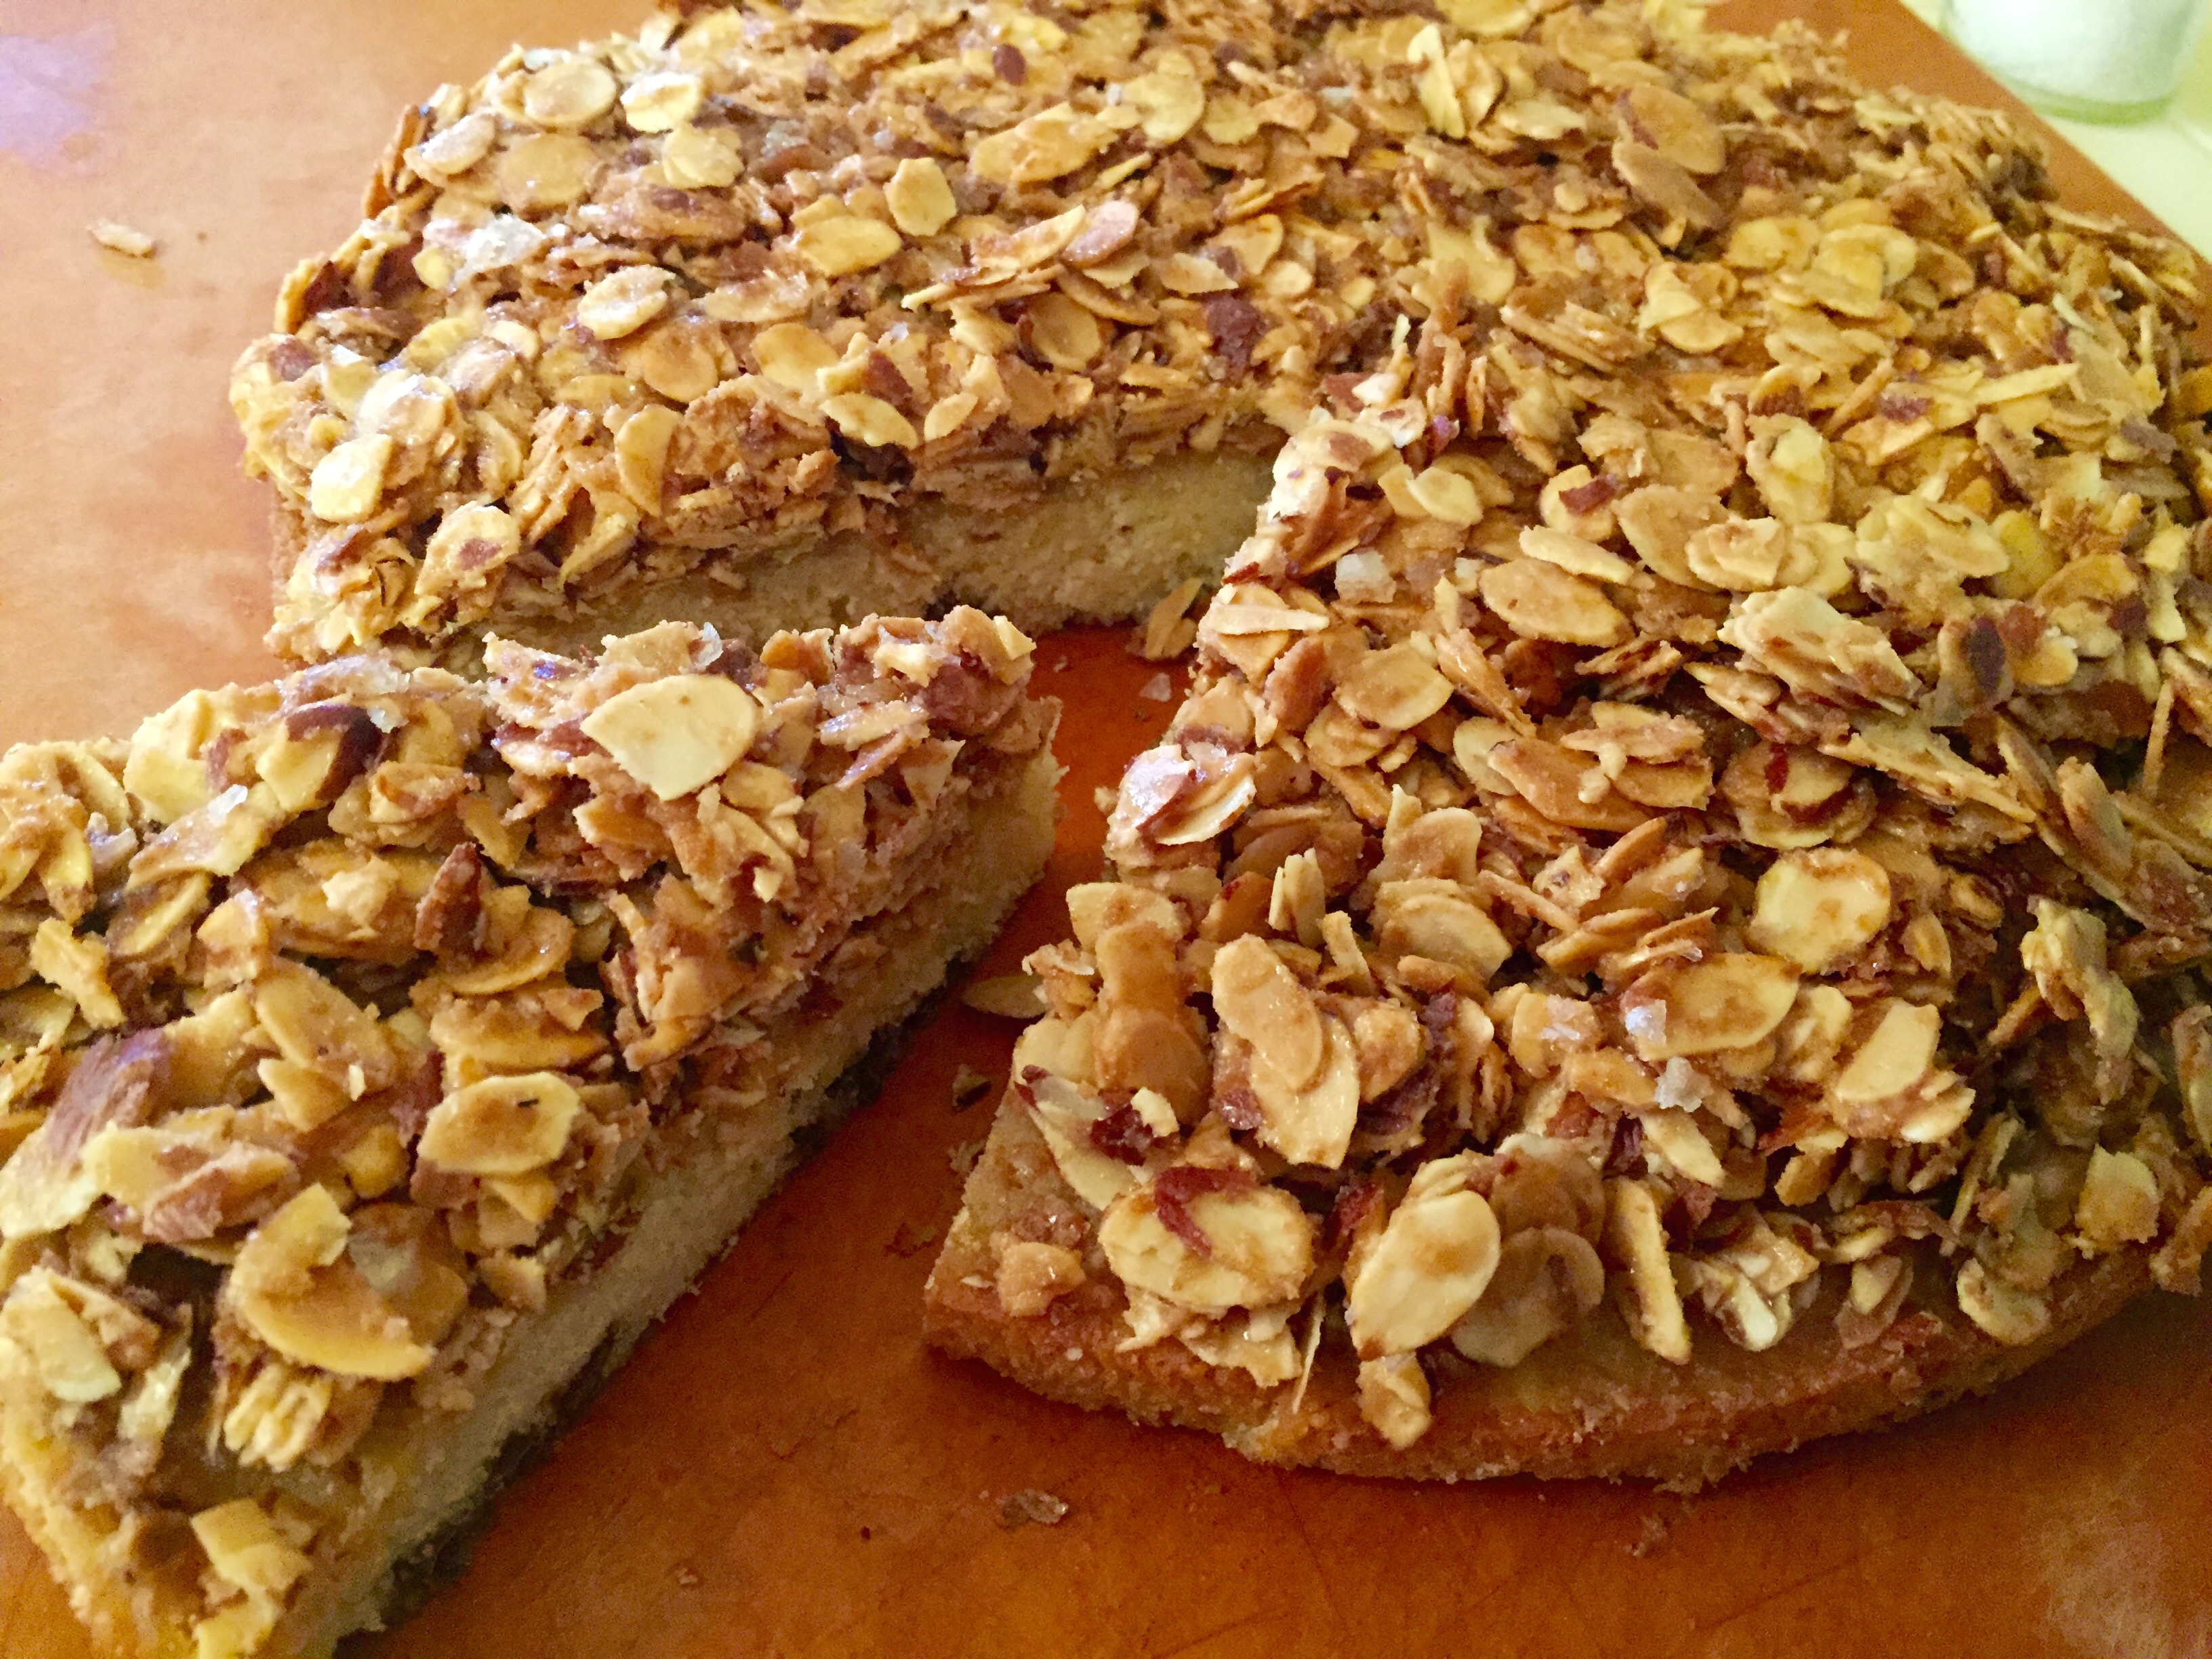
I came across Sweet Paul magazine and it tempts me daily with its Facebook posts.  Last night, my family fell asleep early and I was wide awake. So, I decided to bake a cake. Not just any cake; a Salted Almond Praline Cake. The recipe was easy to follow. I made one adjustment. I added 1/2 cup of semi-sweet chocolate chips to the batter. I can’t resist salty, sweet, and chocolate.

This morning my family was pleasantly surprised when they saw a delicious cake awaiting them. You know it’s good when your husband says, “Why don’t you bake more often? This is good shit.” Now that’s a rave review in my house.

I dare you to not enjoy the salted almond praline topping that adds crunch as it melts in your mouth. Try not to lick up the topping that has fallen off when you took a forkful of cake. This cake should be called “No Crumb Left Behind.” Every bite was a blissful union of salty and sweet.

Warning: Baking a cake at 10pm can lead to a few minor mistakes. I used my 11-inch cake pan instead of the recommended 9-inch pan. It still turned out just fine, but I reckon that the smaller pan would have lead to a thicker cake.

saltedalmondprailinecakesliced

I Like You A Latke!

latkefinal

Latkes aka potato pancakes. This spud dish can be served at any meal time. At breakfast, serve along some fluffy scrambled eggs; at lunch, serve along some juicy bratwursts; and, at dinner, serve along some fresh salmon. There’s a lot to like about latkes! I’d write more but I have latkes to eat.

Latkes (Potato Pancakes)

Makes approximately 10 latkes

Prep time 8-10 minutes, Cook time 12-15 minutes

Ingredients

  • 1 pound, 6 ounces russet potatoes, shredded (approximately 3-4 russet potatoes)
  • 2 eggs, beaten
  • 2 green onions, diced
  • 1 teaspoon kosher salt
  • 1/4 teaspoon freshly ground black pepper
  • 3 tablespoons flour
  • 5 tablespoons of olive oil
  • salt and pepper (you’ll need to sprinkle a little on your finished latkes)

Directions

In a medium-sized mixing bowl, beat eggs. Add green onions, salt, black pepper, and flour. Mix to combine. Next, stir in shredded potatoes and mix thoroughly.

latkebowl

Preheat a large skillet over medium-high heat. When skillet is hot, add 4 tablespoons of olive oil. Using a spoon, scoop up potato mixture and place in pan to cook your first batch. (You’ll need to cook in 2 batches. You should be able to fit 5 latkes per batch.)

latkepan

Cook latkes for approximately 3-4 minutes per side. When you turn over the latke, it should be golden brown. Place finished latkes on a paper towel-lined plate and add a few grinds of salt and pepper over them. Add 1 tablespoon of olive oil into your skillet and add your final batch of potato mixture. Cook for approximately 3-4 minutes per side. Place a paper towel over the previous batch of latkes and add your just-cooked latkes. Sprinkle with a few grinds of salt and pepper. Serve and enjoy!

I like to eat my latkes with sour cream and applesauce, but feel free to enjoy plain or with other condiments. Anyway you eat it, you’ll like it a latke!

latkeplate

Simply The Best, Burrito Edition

wrappedburrito

I feel like I can finally say I live in San Francisco. Last night, my husband and I had our first burrito in the Mission. You don’t really live here until this flavorful moment. When deciding what burrito would be our “welcome” to the city, we didn’t have to look too far. La Taqueria, cited by many as the “best burrito in the nation,” was an easy decision for us.

Standing in line to place our order, my mouth watered and my stomach grumbled as I watched the workers do their magic and as the smells infiltrated my soul. Yes, there was lots of anticipation. I must admit I was also nervous. I tried not to read and research too much about this place as hype often leads to disappointment. Spoiler alert: I wasn’t disappointed.

unwrappedburrito

Unwrapping my burrito was more exciting than Christmas morning. While the wait was no more than 10 minutes from the line to receiving my order, it felt like a lifetime, a hungry lifetime. The next part was slightly sacrilegious: we cut our burritos in half to share.

carneasada            carnitas

The burritos, carne asada and carnitas, respectively, were all killer no filler. That’s right; no rice. Meat, pinto beans, pico de gallo. We ordered ours as “super” so that adds cheese, sour cream, and avocado. Delicious!

The moisture to meat ratio was spot-on. I tried to eat slowly to savor every bite, but before I knew it, my burrito was gone. And what happened next is why I’m still full this morning. My husband suggested we try a taco since we had been sitting at a counter watching the kitchen at work, drooling the whole time.

chickentacos

Chicken tacos (“super”). When you eat your burrito so fast that your stomach hasn’t registered its fullness, this occurs. I have no shame or regrets. I will be wearing sweatpants today though.

The tacos were a tortilla marvel. As you can see in the picture, they use two tortillas per taco. The genius is that the inner tortilla is slightly fried and has a slice of cheese so it has a crispy, melted cheese foundation. The outer tortilla is soft like blanket that cradles the whole concoction. The chicken was juicy and I may have a crush on their pico de gallo.

At this point, my stomach registered it was beyond full and my brain went to survival mode. My husband and I drove to the Palace of Fine Arts to take a walk to work off our gluttony. It was a gorgeous night in the city and the Palace of Fine Arts was a location we had never ventured to before.

palaceoffinearts

Built in 1915, the Palace of Fine Arts is an architectural gem. It’s also a great space for a leisurely walk to burn off excess calories. However, I think most visitors at night are here for its romantic setting. We witnessed two marriage proposals and one make out session on a park bench. My husband and I walked hand-in-hand the moonlight and let it soak in that we are officially “San Franciscans.”

Just Hashing It Out

swp plate

Usually, I don’t get too creative with breakfast during the week. Who has time? Well, some mornings you make time because you wake up and are craving eggs. And I can’t just cook eggs. I need to make an omelet, a scramble, or in today’s case, a hash. I often wish for a “breakfast fairy” that magically makes me a hot and fresh breakfast masterpiece. Yes, there’s a lot of amazing delivery services available in San Francisco. Sadly, breakfast delivery isn’t a reality between the hours of 7am-9am. (If you know of a place, please let me know.) While I wait for my wish to come true, I head to the kitchen and make my own hot and fresh breakfast masterpiece.

Sweet Potato Hash with Arugula and Bacon

Prep time 5-10 minutes, Cook time 15-20 minutes

Serves 2-3 people

Ingredients

swpingredients

  • 1 tablespoon olive oil
  • 2-3 strips of bacon, chopped (I just use kitchen shears to cut bite-size pieces)
  • 1 large sweet potato, medium-diced
  • 1 cup arugula, torn into bite-size pieces
  • 5 eggs, beaten
  • sea salt
  • black pepper

Directions

Preheat a large skillet over medium high heat. Add chopped bacon and olive oil and cook for 2-3 minutes. Next, mix in sweet potato and cook for 8-10 minutes, stirring occasionally. Fold in eggs and cook for 2-3 minutes, stirring constantly. Stir in arugula and cook until wilted, approximately 1 minute. Remove from heat. Add a few grinds of salt and pepper to taste. Serve and start your day off right. Mmmm breakfast!

swptri

Who You Calling Shrimp, Stir-Fry?

stiryfrybowl

There’s nothing shrimpy about this shrimp stir-fry. It’s packed with flavor and fresh veggies. It’s a quick and healthy meal that will please your family, friends, and most importantly, yourself. I find myself making this dish whenever I go a little crazy at the produce market. That’s right, vegetables can bring on a frenzy. Shrimp is the perfect protein to compliment this veggie party. It may take some time with all the chopping, dicing, and mincing, but it’s worth it. Trust me. I write bite-size blog posts and have personally eaten and approved this meal.

Shrimp Stir-Fry

Prep time 10-15 minutes, Cook time 15-17 minutes

Ingredients

  • 1 pound raw shrimp, peeled and deveined
  • 2 tablespoons olive oil
  • 3 green onions, diced
  • 1 red pepper, sliced
  • 2 carrots, peeled, and chopped diagonally
  • 5 oz. crimini mushrooms, sliced
  • 1 baby bok choy, chopped (separate stems from leaves, reserve leaves for last addition to stir-fry)
  • 1 teaspoon sesame seeds (1/2 teaspoon added during cooking, the other 1/2 teaspoon added before serving)
  • 1 teaspoon Chinese 5-spice blend
  • 1 teaspoon Kosher salt
  • 2 cloves garlic, minced
  • 1 heaping teaspoon fresh ginger, minced (I’ll be honest; I was out of fresh ginger so I substituted 1/2 teaspoon ground ginger.)
  • 2 teaspoons soy sauce

Directions

First step: Prep your vegetables.

vegs           cutveggiesstirfry

Next, heat 2 tablespoons of olive oil in a large skillet or wok over medium-high heat. Add your carrots, red pepper, and bok choy stems and cook for 4-5 minutes, stirring occasionally. Mix in the green onions, garlic, and ginger, cooking for 2-3 minutes. Then, stir in mushrooms and let sweat for 1 minute. Sprinkle in 1/2 teaspoon of sesame seeds, the Chinese 5-spice blend, and Kosher salt. Stir to combine and cook for approximately 1 minute. Now add your shrimp, stirring occasionally and cook for 3-4 minutes (Shrimp cook quick. Don’t overcook!). Drizzle in soy sauce and add the bok choy leaves. Stir to combine, remove from heat, and sprinkle with the remaining sesame seeds.

I like to serve this stir-fry over a bed of rice, but feel free to eat as is or over a bed of fresh spinach dressed in a little olive oil and salt and pepper for flavor.

tristirfry

Grown-up Grilled Cheese

wholegrilledcheese

Grilled cheese is the sandwich of childhoods. This being said, there is no reason why this sandwich can’t grow up with you. People talk about peanut butter and jelly, but bread and cheese are my favorite pair. You don’t have to get too fancy. Less is more. I suggest that your cheese selection include a yellow and a white varietal. I like sharp cheddar and provolone, but I’ve also enjoyed smoked gouda and American, mild cheddar and muenster, or even Colby and mozzarella.

Grown-up Grilled Cheese

Prep time 5-12 minutes, Cook time 4-5 minutes

Ingredients

  • 2 slices of bread (You don’t have to feel guilty if you still crave the classic white bread. I totally opted for Wonder Bread this time around.)
  • 2 slices sharp cheddar cheese
  • 2 slices provolone
  • 2 tbsp butter, softened (You need to be able to spread the butter on the bread.)
  • 2 slices of tomato
  • 4-6  slices of avocado (Basically, it’s half of an avocado)
  • 2 strips of bacon, cooked, and each strip torn in half (I just quickly fry it up in pan for approximately 7-9 minutes or use leftover bacon from when I bake a batch.)

Directions

Preheat a medium-sized skillet over medium heat. In the mean time, it’s sandwich assembly time. Spread butter on one side of each slice of bread. Make sure you have your cheese, tomato, avocado, and bacon ready to go.

grilledcheesprep

Place one slice of bread, buttered side down, in your skillet. Then, place a slice of cheddar, a slice of provolone, tomato, avocado, bacon, the other slice of cheddar, and the other slice of provolone. Top with the other slice of bread, buttered side up. Cook for approximately 2 minutes (You want to flip your sandwich when the side is nice and golden brown). Using a turner, flip over the sandwich and cook for approximately 2 minutes, until golden brown. Let cool for 2-3 minutes and dive into your grown-up grilled cheese.

trigrilledcheese

Kale Chips

washedkale

My backyard garden is starting to produce kale that is ready for harvest. This first batch was requested to be transformed into kale chips by my husband. The photo above, is my freshly-cut Toscano kale. Kale chips seem to be the “it” snack of the moment, but that doesn’t mean much to me. Kale is a delicious leafy green that naturally reduces blood pressure  and is an all-around vitamin powerhouse. These chips will be what you crave…

Kale Chips

Prep time, 7-10 minutes, Cook time 10-15 minutes

Ingredients

  • 1 bunch kale
  • 1 tablespoon olive oil
  • 1 teaspoon sea salt
  • 1/4 teaspoon freshly ground black pepper
  • 1/2 teaspoon red pepper flakes (optional)

Directions

Preheat oven to 350 degrees F. Wash and dry your kale with some paper towels or a salad spinner. Then, remove the stems from the leaves using a knife, kitchen shears, or your clean, bare hands. I’m a fan of just using my hands. Tear into bite-size pieces (Not too small!*). Spread kale out on a baking sheet.

tornkale

Next, drizzle olive oil and sprinkle salt and pepper over kale. Toss and mix together the kale and spread evenly on baking sheet. I like to add red pepper flakes to the mix because it provides a spicy kick, which I find even more addictive.

Place baking sheet in oven on middle rack and bake for 10 -15 minutes. Kale chips are done when the edges are brown, but not burnt. Burnt isn’t tasty so set a timer for 10 minutes and check.

kalechips

*Warning: Kale shrinks when baked so don’t tear into tiny pieces and don’t be surprised when you take your batch out of the oven and you feel like some has already disappeared.

Bakin’ Bacon

baconcooked

Oh Bacon! You can fry it in a pan. Cook it on an electronic griddle. But, my favorite is baking bacon. It’s simple and less messy. Plus, it’s easy to drain the grease for future culinary adventures.

Baked Bacon

Prep time 1 minute, Cook time 18-23 minutes

Ingredients

  • 1 pound of bacon (10-12 strips)
  • 2 tablespoons of olive oil

Directions

Line baking sheet with aluminum foil. Add strips of bacon, making sure that the bacon strips are not overlapping. Drizzle olive oil over the bacon.

baconpan

Put baking sheet in oven on middle rack. Turn on your oven to 400 degrees F. (That’s right. Don’t preheat your oven. Turn it on when the bacon is inside. The gentle rise in temperature allows for the optimal bacon baking process) Check bacon at the 18-minute point. Depending on thickness and desired crispness, it may take a few minutes longer to cook. Once done, remove from oven and place bacon on a paper towel lined-plate to absorb some of the excess fat. Serve and enjoy!

Once the bacon grease on the pan cools, I like to pour it into tupperware and reserve for future recipes. I just store it in the refrigerator and use as needed. Can you say bacon fat popcorn? Simply substitute the bacon fat for the olive oil.

Snap, Crackle, Popcorn

popcorn

My sister-in-law said the other day that my blog is composed of bite-size posts. I love this description. It also made me hungry for a bite-size snack.

Popcorn! It’s an exciting snack. It pops! Stovetop popcorn can be intimidating. I’ve added too many kernels in my saucepan before and had a very messy popcorn explosion all over my stovetop. It happens. You just have to clean up and try again.

Stovetop Popcorn

Cook time, 3-4 minutes

Ingredients

In a heavy 3-quart saucepan, add olive oil and kernels. Put heat on medium-high and cover your pan. Slide the pan back and forth over the burner. You want the oil to continuously cover the kernels and not burn. I like to call this step “shake it up.”  Alike with microwave popcorn, once you hear the popping slow down for a few seconds between pops, you’re popcorn is ready. Remove from heat. Add salt and pepper to taste and mix together. Feel free to add other seasonings such as melted butter, Parmesan cheese, chopped rosemary, etc. Pour into a serving bowl and try to share.

popcorninpan

The Other White Meat

porkplate

Here’s an important life lesson: Listen to your butcher. When he or she tells you that the pork chops are especially delectable, just buy them. They know what’s fresh and they won’t steer you wrong. Implied in this lesson is that you really should support your local butcher, not your cheaper mega market. I know, I know…I don’t mean to be preachy. In a pinch, I go to the mega market. I won’t lie. It’s often cheaper and convenient for multiple grocery items. But, in the past few years, I’ve made the effort to plan ahead so I can support my local butcher and community market. My tastebuds thank me. And my butcher was right about the pork chops; they were tasty.

Parmesan Panko-Crusted Pork Chops

Prep time 5-7 minutes, Cook time 12-15 minutes

Ingredients

  • 1 pound center cut, boneless, pork chops
  • 1/4 cup of all-purpose flour
  • 1 egg, beaten
  • 3/4 cup Panko bread crumbs
  • 1/4 cup Parmesan cheese
  • 1 teaspoon kosher salt
  • 1/2 teaspoon freshly ground black pepper
  • 2 tablespoons olive oil

Directions

Prep your pork. I recommend making a “station” for your flour, egg, and Panko mix (add Parmesan, salt, and pepper you your bread crumbs and mix together)

breadingstation

Once your pork chops are nice and breaded, heat olive oil over medium-high heat in a frying pan. Cook pork until golden brown with an internal temperature of 145 degrees F, approximately 5-7 minutes per side (depends on the thickness of your chops).

pankopan

Remove from heat and let rest for 3-5 minutes prior to serving.